Handbell and
Handchime Notation
Handbell and
Handchime
Difficulty Level System
Solo and Ensemble Notation

The AGEHR, Inc.
1055 East Centerville Station Road
Dayton, Ohio 45459-5503
(800) 878-5459
FAX (937) 438-0434
2010 Edition
© The American Guild of English Handbell Ringers, Inc.
Cover design by J. R. Smith
2

3
The guidelines presented in this booklet are a product of national conferences whose
participants have included composers, arrangers, editors, engravers, publishers, and
performers of handbell music. The Eighth Conference was convened in Tucson,
Arizona, on July 19 2009, following the American Guild of English Handbell Ringers,
Inc. National Seminar. The conference was open to anyone interested in handbell and
handchime notation.
This booklet is divided into three sections:
Part A (pages 8-23) is the Handbell and Handchime Notation section.
Part B (pages 24-26) is an explanation of
Assigning Difficulty Levels to Handbell and Handchime Music.
Part C (pages 27-32) deals with Solo and Ensemble Notation
Part A
The Handbell and Handchime Notation is a summary of the July 19, 2009, meeting and
was compiled by the following committee: Dr. John A. Behnke, Sueda Luttrell, Arnold
Sherman, Martha Lynn Thompson, and David Weck.
Part B
The Handbell and Handchime Difficulty Level System is a summary of the July 29,
1999, meeting and was compiled by the following committee: William H. Griffin
(Chair), David Ruder, Susan Ullom-Hungerford, and David Weck. The Seventh
Notation Conference in Dallas and the Eighth Notation Conference in Tucson did not
make any modifications to Part B.
Part C
The Solo and Ensemble Notation is a summary of the July 19, 2009, meeting and was
compiled by the following committee: Dr. John A. Behnke, Sueda Luttrell, Arnold
Sherman, Martha Lynn Thompson, and David Weck.

The English Handbell
A musically tuned bell with a handle made of leather or plastic which allows it to be held
in the hand. The inclusion of the word “English” is based upon the history of the
handbell itself and pertains to the clapper suspension. The modern tuned handbell is
English in origin. Its clapper is mounted and hinged so that it will strike both forward
and back in a single plane. Restraining springs prevent the clapper from lying against the
handbell when it is held with its mouth upright. The English handbell is made of bell
bronze (ca. 80% copper and 20% tin) and is tuned in such a way that the fundamental
and the 12th overtone are dominant.
The Handchime
The handchime is a metal tube, most commonly an aluminum extrusion, slotted and cut
to produce a musical tone. The length of the slot in the tubing determines the
fundamental pitch which is the clearly dominant tonal element. The length of the
unslotted portion (that which is held in the hand) is fitted with a plug to provide
substantial reinforcement of the pitch produced by the slotted portion (the tines). The
clapper mechanism is externally mounted and strikes the tube at a predetermined point to
produce the desired pitch.
4

5
Table of Contents
Sizes of Handbell and Handchime Sets and Octave Designation .................................... 7
Part A—Handbell and Handchime Notation
Notation Symbol Chart ................................................................................................. 8-9
Layout ........................................................................................................................... 10
Optional Notes ..................................................................................................... 10
Enclosures for Optional notes .............................................................................. 10
Paper Stock ....................................................................................................................10
Handbells Used Chart and Handchimes Used Chart ................................................ 11-12
Handchime Notation ................................................................................................. 12-13
Voice-Leading Lines ..................................................................................................... 13
Cautionary Accidentals ................................................................................................. 13
Notational Devices for Handbell and Handchime Techniques ................................. 14-22
Ring ............................................................................................................................... 14
LV ............................................................................................................................ 14-15
Damp ............................................................................................................................. 15
Selective Damp ............................................................................................................. 16
Swing .......... ....... ....... ....... ...... ....... ....... ...... ....... ....... ....... ...... ....... ....... ....... ...... ....... ....... 16
Stopped Sounds Indicated by the Staccato Dot ............................................................. 17
Pluck .................................................................................................................... 17
Tap Pluck ............................................................................................................. 17
Thumb Damp ....................................................................................................... 17
Hand Damp .......................................................................................................... 17
Pluck Lift ............................................................................................................. 17
Mallet .................................................................................................................. 17
Mallet Lift ............................................................................................................ 18
Martellato Techniques ................................................................................................... 18
Mallet Techniques ......................................................................................................... 19
Handbell Tree or Bell Tree ............................................................................................ 20
Shake ............................................................................................................................. 20
Vertical Bracket ................................................................................................... 20
Trill .................... .................... .................... ..................... .................... .................... ....... 21
Brush Damp ................................................................................................................... 21
Controlled Diminuendo ................................................................................................. 21
Ring Touch .................................................................................................................... 21
Gyro and Spiral Gyro .................................................................................................... 21
Singing Bell ...................................................................................................................21
Echo ................ ...... ....... ....... ....... ...... ....... ....... ....... ...... ....... ....... ....... ...... ....... ....... .......... 22
Vibrato .................. .......... ........... .......... .......... .......... .......... .......... .......... .......... .............. 22
Rolled Chord ................................................................................................................. 22
Table Land Damp .......................................................................................................... 22
Seldom-Used Symbols .................................................................................................. 23
I.
II.
III.
IV.
V.
VI.
VII.
VIII.
IX.

6
Handbell and Handchime Music—Difficulty Level System ................................. 24-26
Level 1 ...............................................................................................................25
Level 2 ...............................................................................................................25
Level 3 ...............................................................................................................25
Level 4 ...............................................................................................................26
Level 5 ...............................................................................................................26
Level 6 ...............................................................................................................26
Part B—Handbell and Handchime
Music Difficulty Level System
Part C—Solo and Ensemble Notation
General Notation Concerns/Solo and Small Ensemble ............................................... 27
Symbols Common to Solo and Ensemble Music ........................................................ 27
Placement of Handbells on the Table ......................................................................... 28
Definitions ........................................................................................................ 28
Displacement .................................................................................................... 28
Notational Devices ............................................................................................ 28
Notation Specific to Small Ensembles ................................................................... 29-30
Multiple Handbell Configurations .............................................................................. 30
Definitions ........................................................................................................ 30
Four-in-Hand Symbols ...................................................................................... 31
Shelley Symbols ............................................................................................... 31
Six-in-Hand Symbols ........................................................................................ 32
Traveling Four-in-Hand Symbols ..................................................................... 32
Handbell Tree (Bell Tree) Symbol .................................................................... 32
I.
II.
III.
IV.
V.
œ
?
œ
œ
œ
œ
œ
œ
œ
œ
œ
œ
œ
œ
œ
œ
œ
œ
œ
œ
œ
œ
œ
œ
&
œ
œ
œ
œ
œ
œ
œ
œ
œ
œ
œ
œ
œ
œ
œ
œ
œ
œ
œ
œ
œ
œ
œ
œ
œ
œ
œ
C2 D2 E2 F2 G2 A2 B2 C3 D3 E3 F3 G3 A3 B3 C4 D4 E4 F4 G4 A4 B4 C5 D5 E5 F5 G5 A5 B5 C6 D6 E6 F6 G6 A6 B6 C7 D7 E7 F7 G7 A7 B7 C8 D8 E8 F8 G8 A8 B8 C9
32 31 30 29 28 27 26 25 24 23 22 21 20 19 18 17 16 15 14 13 12 11 10 9 8 7 6 5 4 3 2 1 07 06 05 04 03 02 01 007 005 003 001
006 004 002
Traditional English Numbering System
Note: Handbells and handchimes are transposing instruments and sound
an octave higher than their written pitch.
85 Bell or Chime Set - C2 to C9
73 Bell or Chime Set - G2 to G8
61 Bell or Chime Set - C3 to C8
49 Bell or Chime Set - G3 to G7
37 Bell or Chime Set - C4 to C7
25 Bell or Chime Set - G4 to G6
American Numbering System
Handbells
2 Octaves G4 to G6
3 Octaves C4 to C7
4 Octaves G3 to G7
5 Octaves C3 to C8
6 Octaves G3 to G8
7 Octaves C2 to C9
G1 to B1 are also available
Sizes of Handbell and Handchime Sets and Octave Designation
Handchimes
2 Octaves G4 to G6
3 Octaves C4 to C7
4 Octaves G3 to G7
5 Octaves C3 to C8
6 Octaves G3 to G8
7 Octaves C2 to C9
7

Brush Damp
Controlled Diminuendo
Damp Sign
Echo
Gyro
Handbell Tree
Handbell
Handchime
Hand Damp
Notehead shape used for a handchime part to distinguish
it from a handbell part when both are notated on the
same staff
Let Vibrate or Laissez Vibrer
Mallet
Mallet on suspended handbell
Mallet with handbell on table
Mallet Lift
Mallet Roll on suspended handbell
Mallet Roll with handbell on table
Martellato
Martellato Lift
Part A - Handbell and Handchime Notation
I. Notation Symbol Chart
Terminology
BD
CD
8
HB
HC
HD
LV
Mal.

Optional Notes
Enclosures for optional notes
Pluck
Pluck Lift
Ring
Ring Touch
Rolled Chord
Selective Damp for chord notes
Selective Damp for single note
Shake
Singing Bell
Swing
Voice-Leading Lines
Thumb Damp
Table Land Damp
Tap Pluck
Trill
Vibrato
The Voicer’s Mark or Strikepoint is a permanently scribed line inside the
handbell casting applied by the voicing technician to identify the point of
optimum tonal response at which the clapper is aligned in the striking plane.
optional
opt.
( ) [ ] < > { }
Pl
R
RT
TD
9
SB
TLD
TPl
tr
vib.
Voicer’s
Mark or
Strikepoint
II. Layout
10
Music should be limited to eight staves per page.
Black ink on white paper is most desirable.
Use the largest practical-sized notes for greatest legibility.
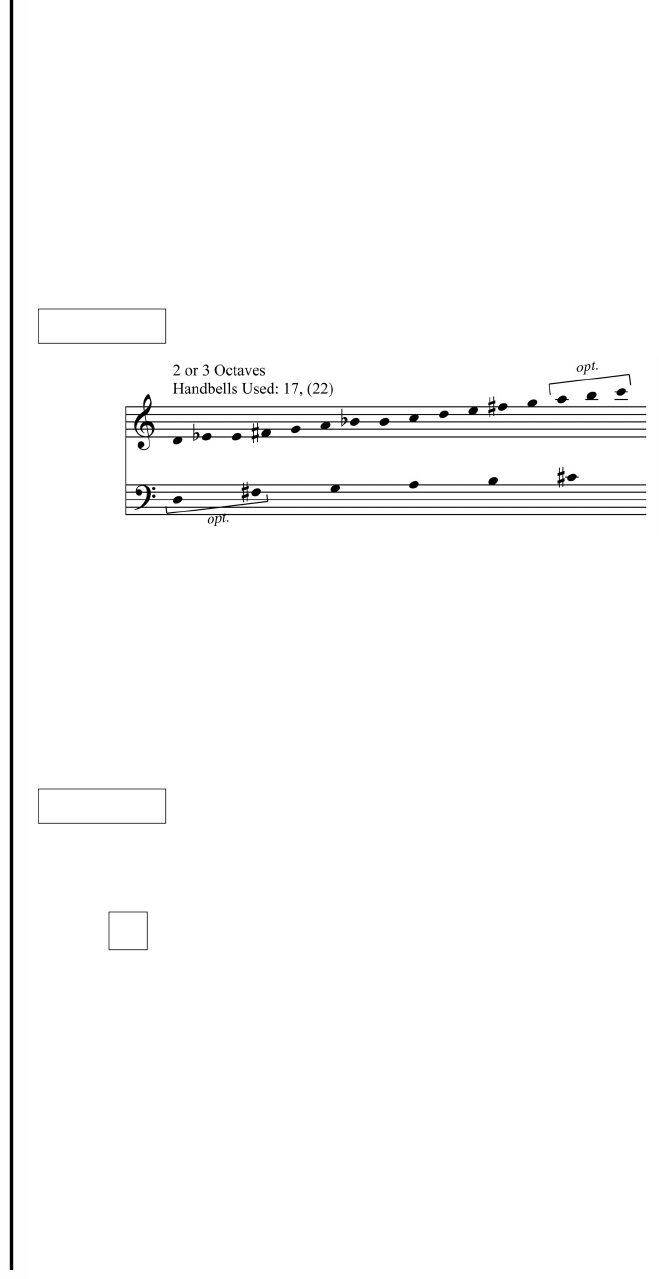
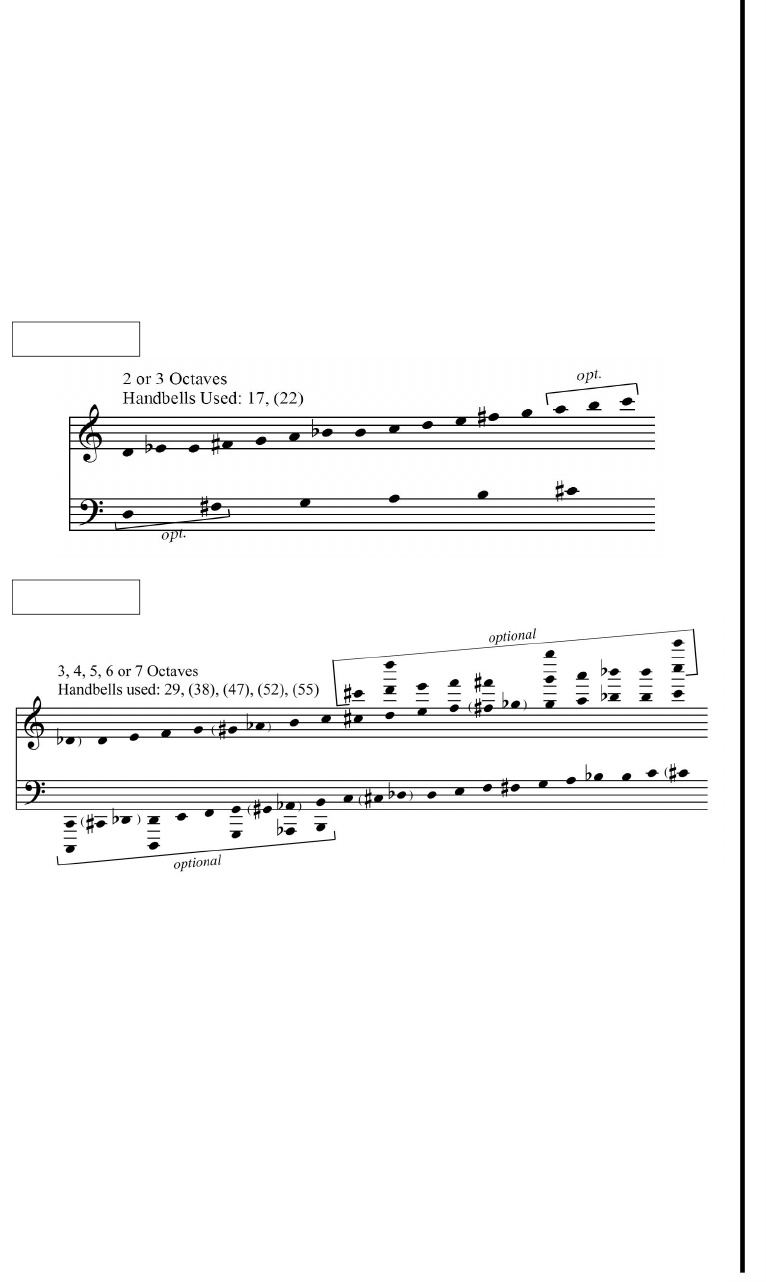
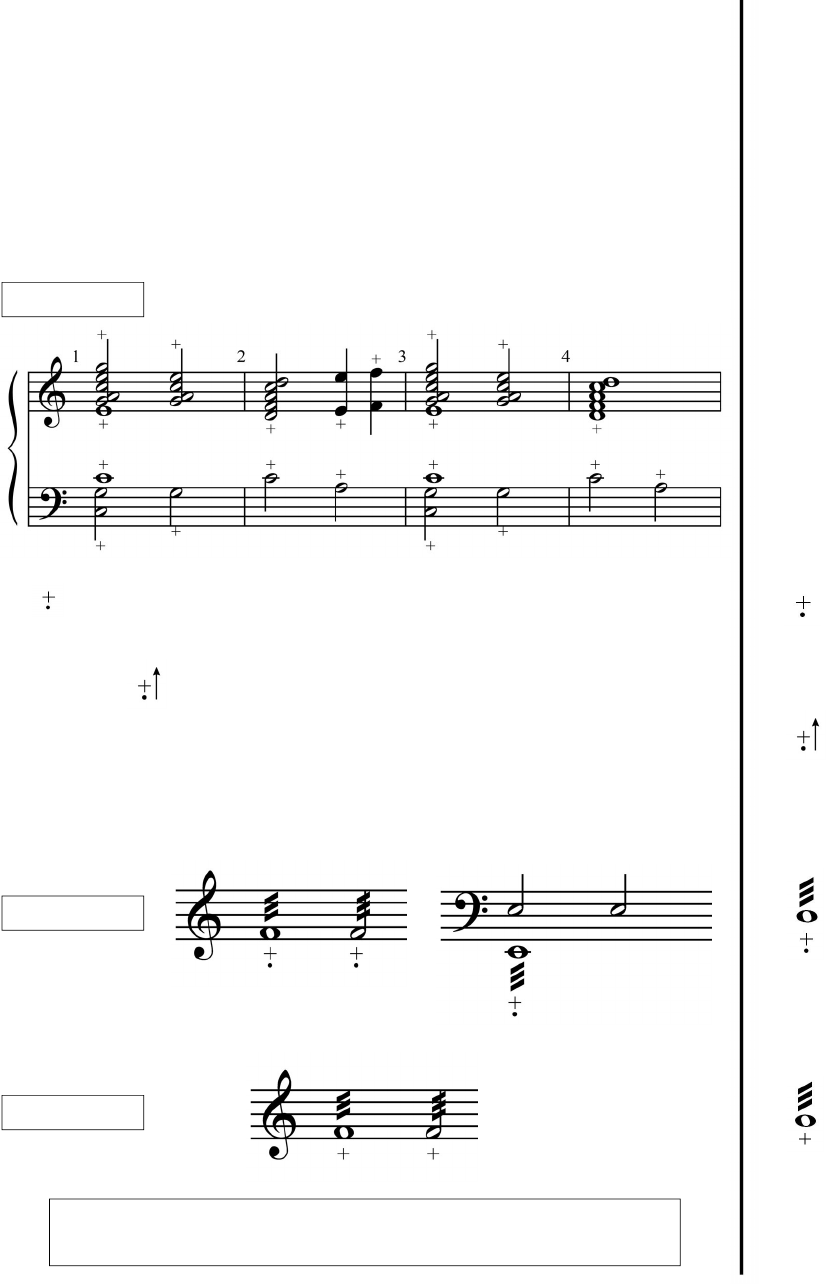
Music for sets of 25 or more handbells (2-3 octave set, Example 1) should be
printed on two staves, one treble and one bass. The bass staff includes all notes
through C
#
5, first ledger line above the bass staff, as shown below:
Optional notes should be full-sized and enclosed in parentheses ( ), square brackets
[ ], angled brackets < >, or braces { }.
Example 1
There are situations where only one staff need be used, such as when music begins
with a single, extended melodic line.
It may be desirable that a handbell part be printed separately when handbells are
used with other instruments or voices.
Composers should suggest a tempo indication (e.g.,
q = ca. 72). Dynamic markings and
other standard notational practices should be used as guidelines for performance.
The cover or title page usually lists the range of handbells in this manner:
Example 2
Inventory Number
Level Number
AG20091
Title
Fanfare
Composer/Arranger
Handel/arr. Smith
Octaves
2 Octaves
Price
$3.95
L2
All measures should be numbered consecutively; numbers should be placed above
the barline and in large enough type to be readily legible at arm’s length.
III. Paper Stock
Paper stock should be of a weight sufficient to permit hard usage in the three-ring
easel-type binders in common use, or to stand upright on a music stand. It is
suggested that not less than 60 lb. paper stock in bound collections and not less than
70 lb. paper stock in single compositions be used. 8 ½ x 11” non-coated, non-glare
finish paper is recommended.
11
IV. Handbells or Handchimes Used Chart
The Handbells Used Chart is placed between the title and the first system or
line of music. A smaller size staff with stemless, solid notes for all pitches may
be used. The staff may or may not be indented.
The use of a grand staff (two staves) is preferable for all Handbells Used
Charts, including those for two-octave music.
Place all notes from C
#
5 downward on the bass staff and all notes from D
b
5
upward on the treble staff. (Examples 3 and 4)
Start treble staff notes adjacent to the treble clef sign, directly over the lowest
note in the bass staff, as in the examples below:
Example 3
Example 4
It is preferable to have the notes in one line without doubling back. However,
when there are too many notes to go on the bass staff in a continuous line, the
notes for which there is insufficient space are placed directly below the note
which is an octave higher. In the treble clef, they are placed directly above the
note which is an octave lower. (Example 4)
Optional notes are also written as stemless solid notes in the same size as the
required notes. They are designated by a longitudinal bracket and the word
optional or opt., as in Examples 3 and 4.
Handchimes Used Chart should be written as diamond-shaped notes, i.e, .
(Additional explanation of Handchime Notation may be found on Page 12.)
‚
When enharmonic pitches are called for, enclose both notes in one set of
parentheses. See how the C
#
5/D
b
5 enharmonic is printed in Example 4.
When handchimes are used in addition to or in conjunction with handbells, it
is strongly recommended that the handchime notes be placed on a separate
Handchimes Used Chart below the Handbells Used Chart. The notes on the
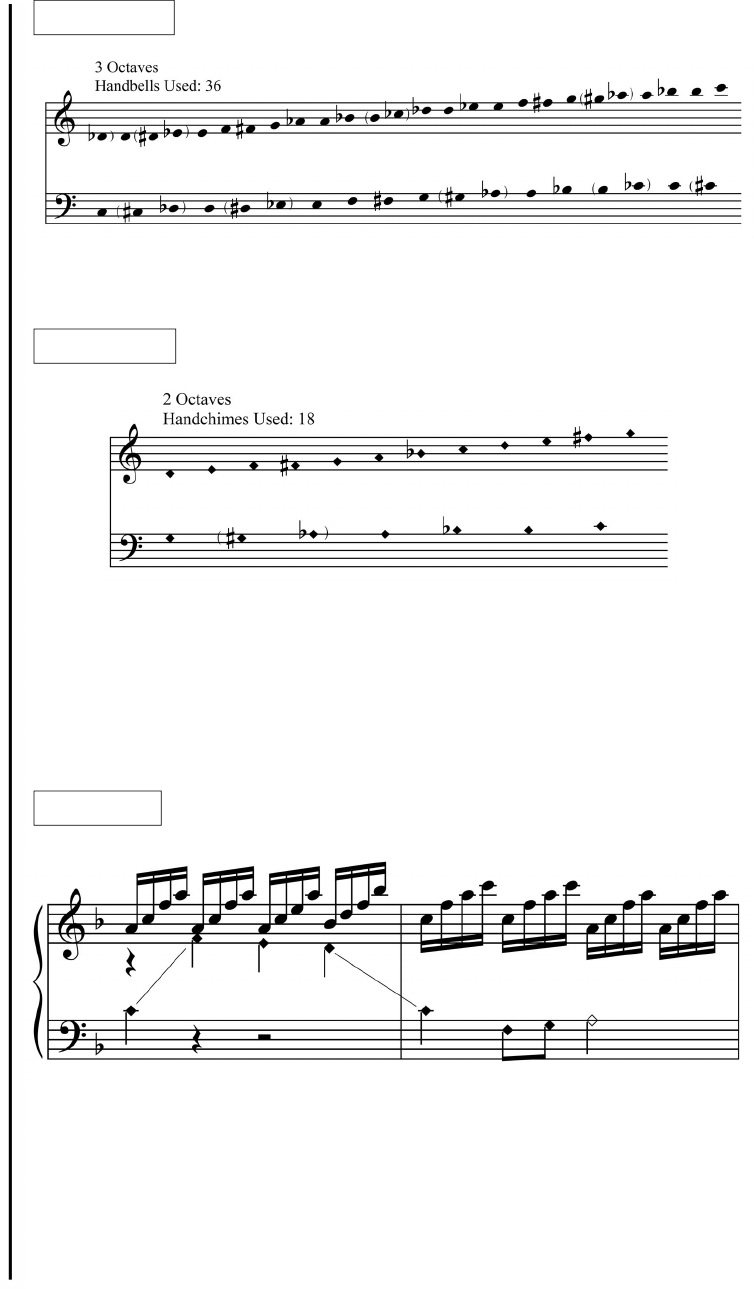
V. Handchime Notation
12
Within a composition, diamond-shaped notes should be used to differentiate
between handchime and handbell notes. (Example 6)
When sections of music are to be rung entirely on handchimes, it is preferable to
notate them in the traditional way, rather than with diamond-shaped notes, and to
set off the entire section in square brackets with an indication that all the notes
within the bracketed sections are to be rung on handchimes rather than handbells.
Example 6
Example 5a
Example 5b
13
Example 7
Example 8
Example 9
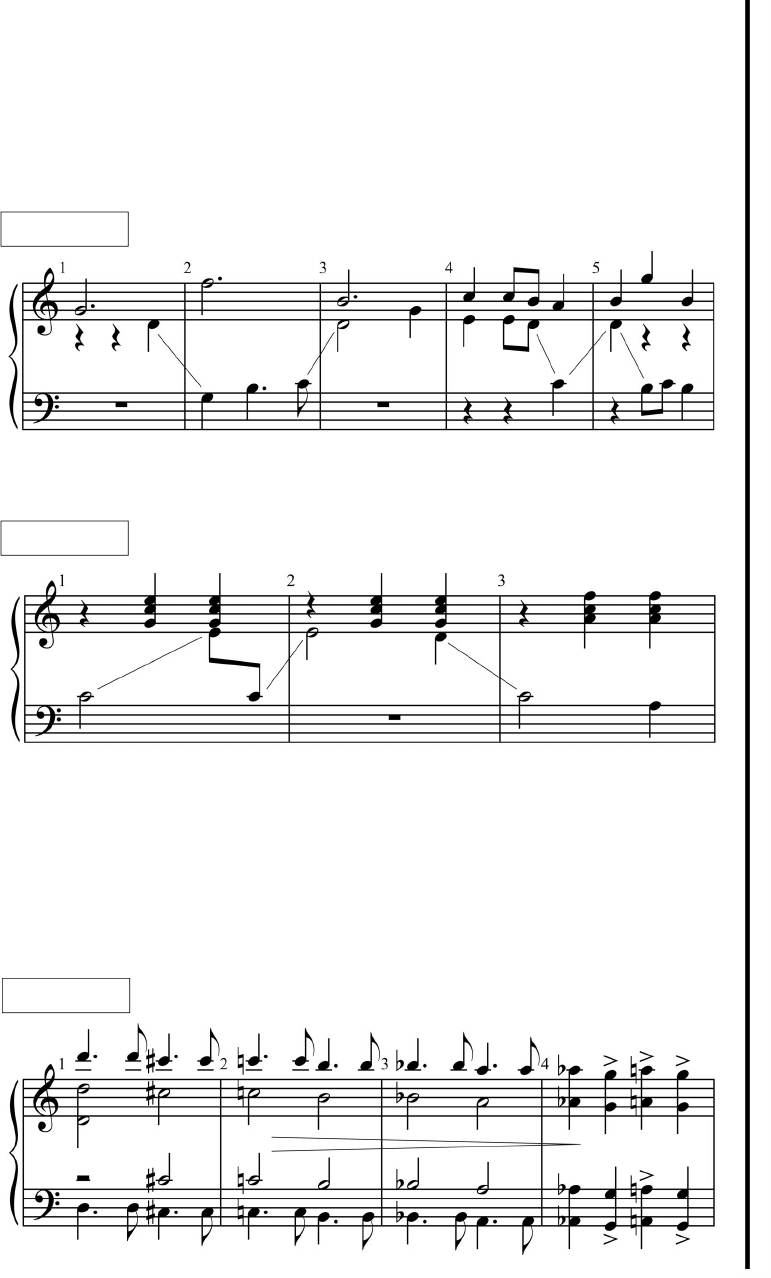
VI. Voice Leading Lines
The movement of any voice, melody or other line from one staff to another may be
clarified by the use of Voice-Leading Lines.
When possible, the Voice-Leading Lines should extend from notehead to
notehead. For additional clarity, rests may be added. (Examples 7 & 8)
1. Voice-Leading Lines with rests
2. Voice-Leading Lines without rests
VII. Cautionary Accidentals
A cautionary accidental is customarily used as a reminder that an accidental from
the previous measure has been cancelled. The use of parentheses on cautionary
accidentals is not recommended. (Example 9)
VIII. Notational Devices for Handbell and
Handchime Techniques
14
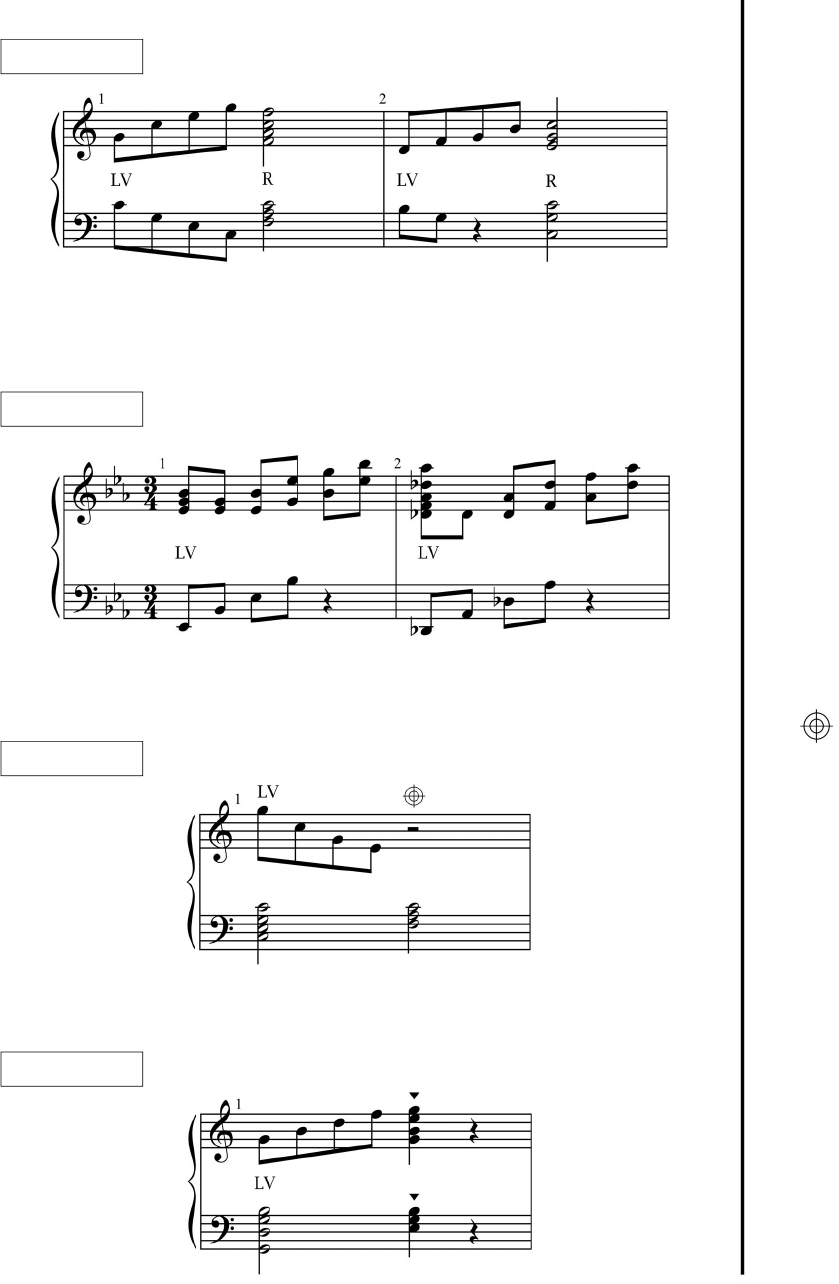
Ring or R
R indicates the normal manner of ringing and damping according to note values.
Also, the use of R indicates a return to the normal ringing and damping technique
after a passage when another style or technique, such as LV or Pluck, has been
used. (See page 17.) It is understood that handbells are to be rung in normal
fashion at the beginning of a piece without the use of the symbol R.
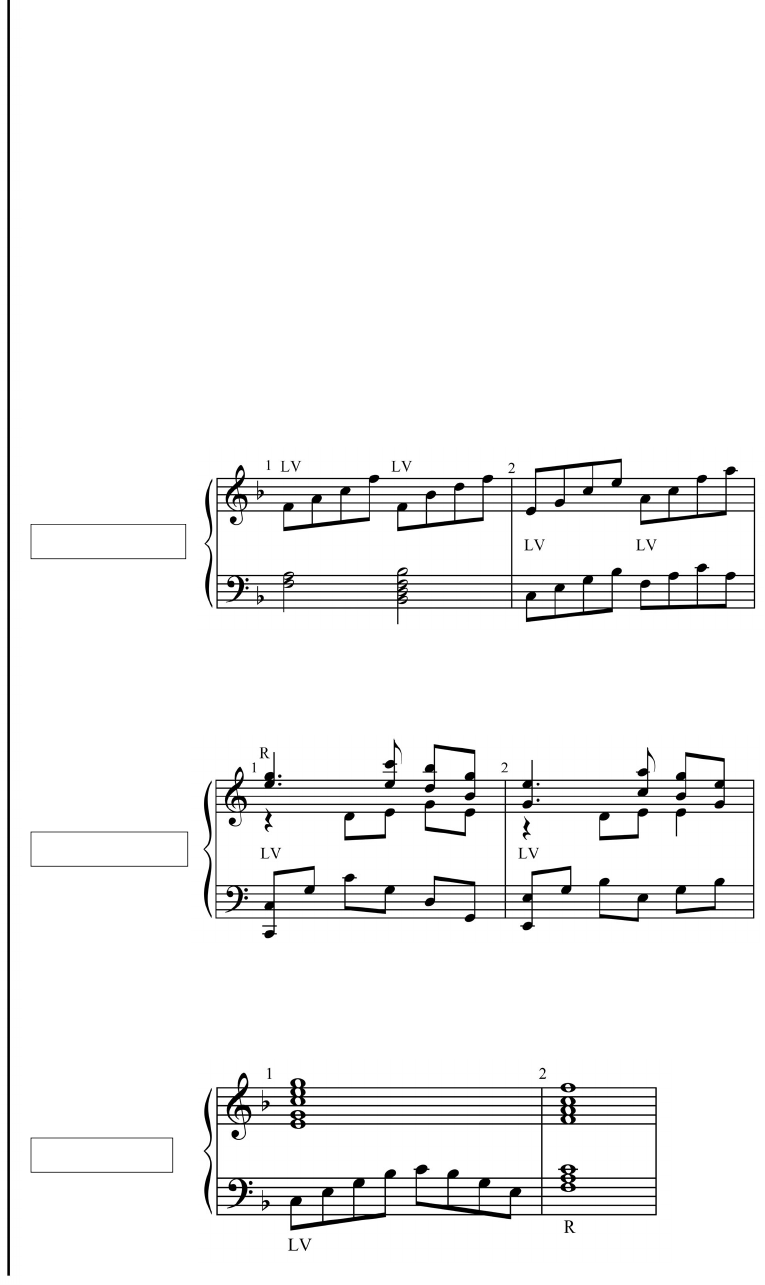
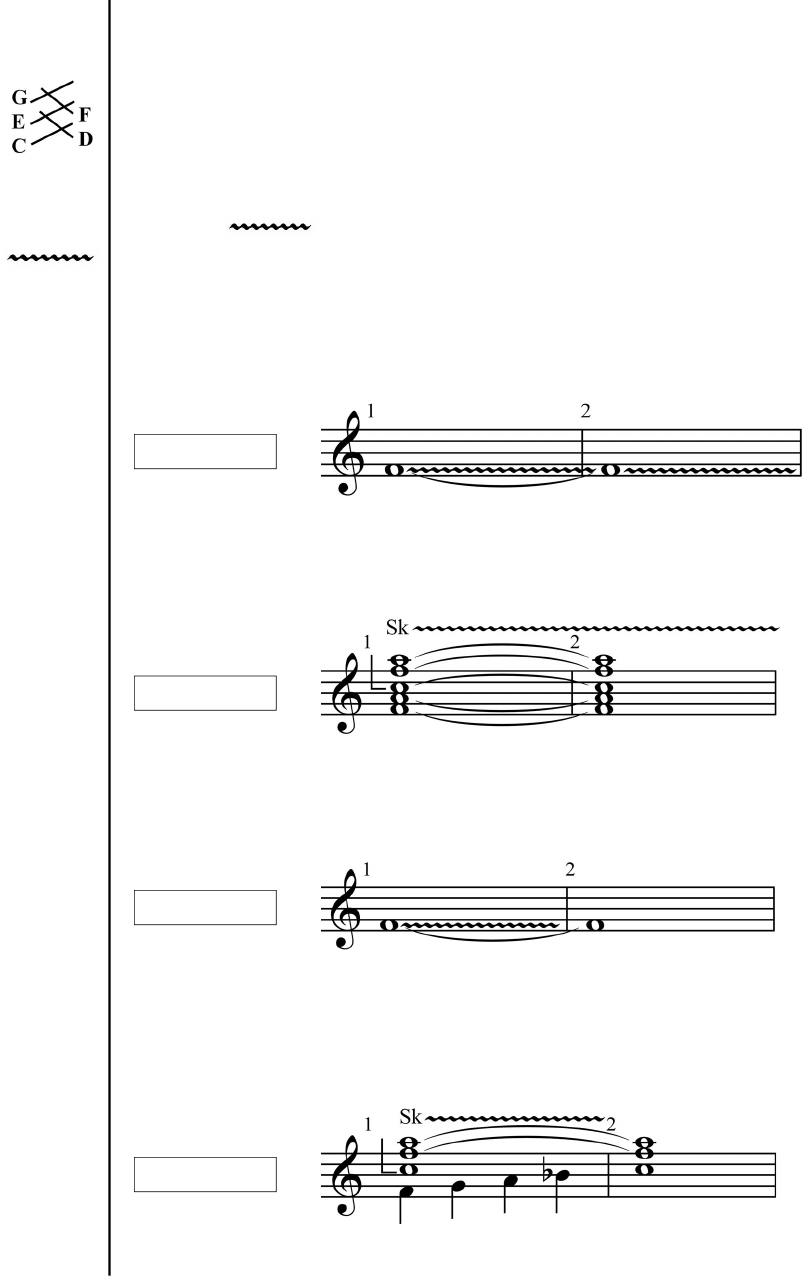
LV
LV is a term meaning “Let Vibrate” (laissez vibrer), allowing handbells to
resonate, regardless of note values or rests, until damping is indicated. LV, if
placed above the treble staff (Example 10a) or below the bass staff (Example 11),
applies to that staff only. An LV centered between staves (Example 12) applies to
both staves. LV markings are used as follows:
1. Successive LV marks signify that all previously sustained notes damp precisely
where the new LV begins. (Example 10a)
Example 10a
Example 10b
Example 11
The LV is for bass staff and lower voices of the treble staff. (Example 10b)
The R indicates that the up-stemmed treble notes are rung. (Example 10b)
2. The LV effect is terminated by one of the following:
a. The letter R (Example 11)
15
An LV centered between staves applies to both staves. (Example 12)
Example 12
Example 13
Example 14
Example 15
When LV passages include rests, the notes continue to sound through the rests.
(Example 13)
b. The Damp Sign
The Damp Sign indicates the cessation of sound in LV passages.
c. The designation of any stopped sound technique
Damp Sign
16
The Selective Damp symbol indicates that only the handbells represented by the
cue-size notes should be damped.
Example 16
Example 17
Example 18
A Damp Sign ( ) incorporated in the stem of a single full-size note (or chord)
indicates the selective damping of that note or chord.
Selective damping may also be footnoted.
Sw indicates a full-arm swing after ringing the handbell. Sw and/or arrows are
used to indicate swings. Arrows should be synchronized with the beats on which
the swings occur. Numbers may be used to specify the beats on which the swings
are made, as in the following example: (Example 18)
Selective
Damp
U X

17
Pluck or Pl
.
Tap Pluck
or TPl
Thumb
Damp
or TD
Hand
Damp
or HD
Pluck Lift
Mallet
or Mal.
Stopped Sounds Indicated by the Staccato Dot
The staccato dot applies to all notes on a common stem and only to those notes.
When using the information in this section, composers should specify which
stopped-sound effect(s) the staccato dots represent.
Pl indicates the “plucking” technique. Handbells are placed on a padded table and
sounded by moving the clapper manually.
TPl indicates that the handbells are placed on a padded table and sounded by
tapping the clapper downward with the thumb.
TD indicates that the thumb of the hand holding the handbell is placed on the
outside of the handbell casting, producing a stopped sound when the clapper strikes
the handbell. The addition of one or two fingers on the casting for all but the
smallest handbells may be necessary to achieve a completely stopped sound.
HD is used with large handbells. When more than one or two fingers on the casting
are insufficient to produce the desired staccato effect, either hand may be placed on
the outside of the handbell casting as the handbell is rung. This technique is also
useful when a staccato note quickly follows a rung note or vice-versa.
To execute a , pluck the handbell in normal fashion and immediately lift it
from the padded table so it continues to sound. A series of Pluck Lifts is indicated
as follows:
Example 19
A indicates that the handbell, resting on a padded table, is struck on the outside
of the casting with a mallet (of the appropriate size, weight and hardness) at the
same distance from the lip at which the clapper strikes. A staccato dot and the
indication “Pl/Mal.” may also be used. (See Mallet Techniques, page 19.)
Example 20
or
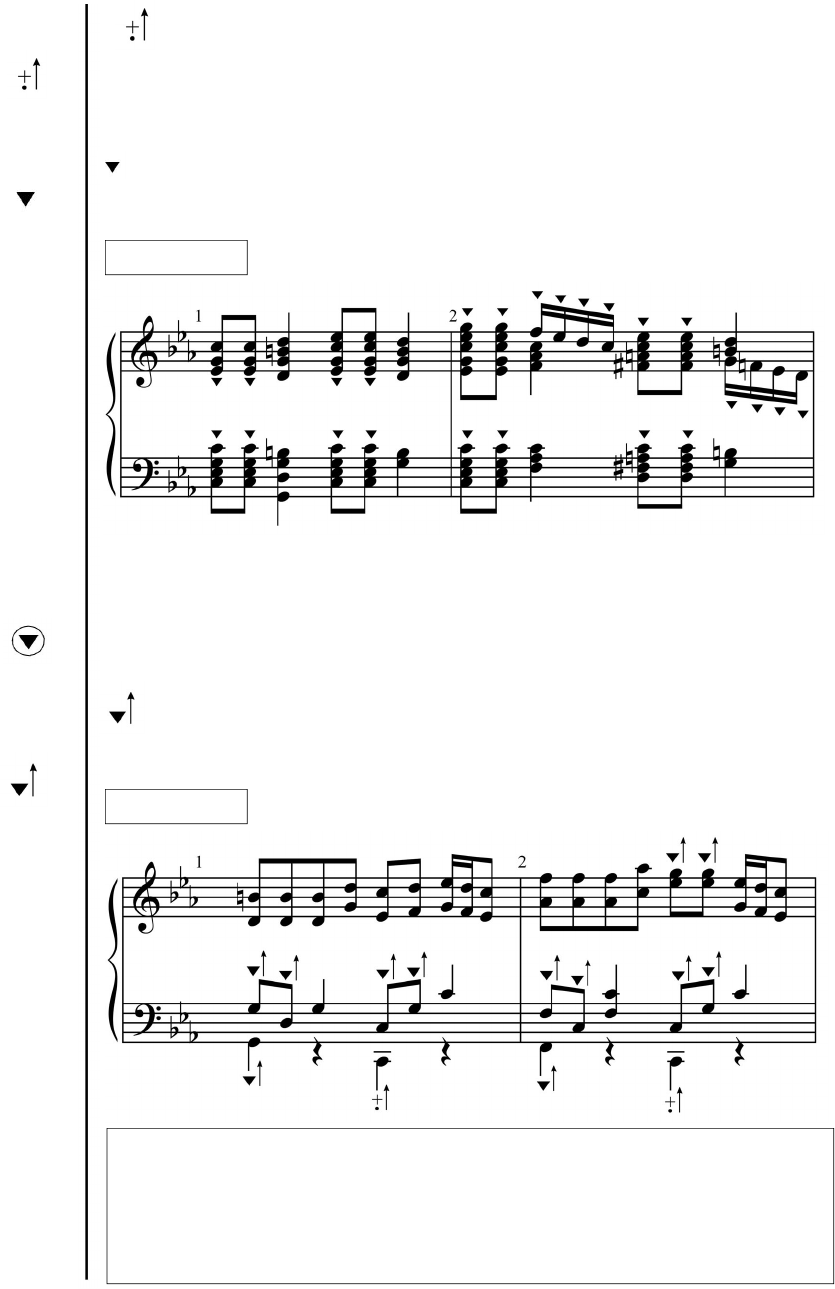
18
Example 21
Example 22
Mallet Lift
Martellato
Martellato
Lift
A indicates a Mallet Lift.
Martellato Techniques
indicates that the handbell is sounded by holding it by the handle and gently
striking the full body of the handbell horizontally on a properly padded table.
indicates a Martellato followed by immediately lifting the handbell to allow
the sound to continue.
WARNING:
Improper use of martellato techniques may damage a handbell. Another
stopped-sound technique, such as Pluck, Pluck Lift, or Mallet Lift, is
recommended for use on handbells below B
3. The use of Martellato and
Martellato-Lift can damage a handchime and should not be used.
(See Mallet Techniques, page 19, and Example 22, page 18.)
A Muted Martellato is executed by placing one or more fingers on the casting of
the handbell while gently striking it on a properly padded table.
Muted
Martellato
19
Mallet Techniques
Example 23
Example 24
Example 25
Mallets are available in different weights and sizes. The mallet should produce
approximately the same timbre as the clapper head does on the soft setting. It is
extremely important that a mallet of the proper weight, size, and hardness be used
to strike the handbell on the outside of the casting at the same distance from the lip
at which the clapper strikes.
A + indicates that a suspended handbell is held by the handle and struck with a
mallet as described above. Handbells struck in this manner are not damped.
The indicates that the handbell is resting on a padded table and is struck with a
mallet as described on page 17. (See Example 20, page 17.)
Mallet
+
Mallet Lift
it as described above. (Example 22, page 18)
A Mallet Lift is executed by lifting the handbell immediately after
striking
A Mallet Roll is similar in technique to a single stroke percussion roll. Holding a
mallet in each hand with a matching grip, the ringer rapidly strikes the handbell at
the strikepoint with single alternating strokes.
Mallet Roll1. Mallet roll with handbell resting on padded table
2. Mallet roll on a suspended handbell
WARNING: Improper use of mallet techniques may
damage the handbell casting.
20
Handbell
Tree
The Handbell Tree or Bell Tree is a series of interlocking handbells held by the
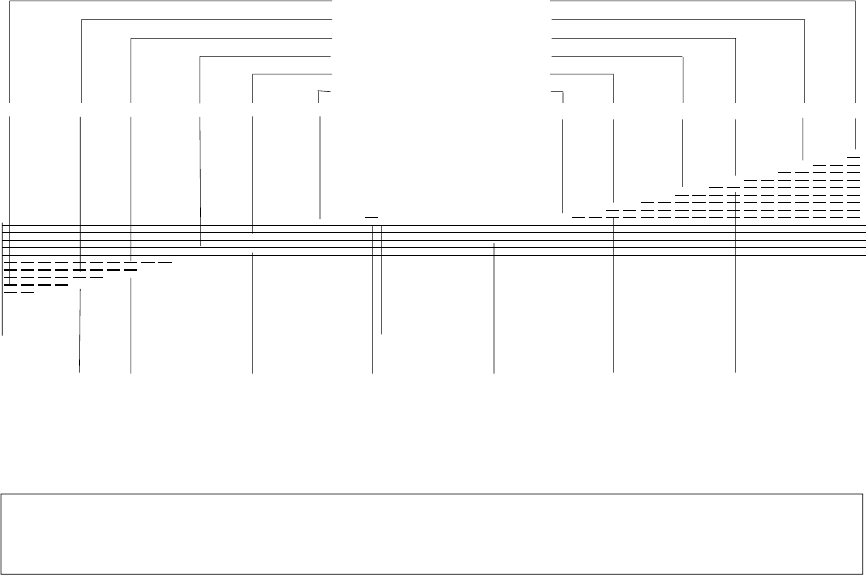
handle of the top handbell and played with a mallet(s). The notational symbol used
for Handbell Trees features a series of interlocking diagonal lines, one for each
handbell used. In this example, the pitch of each bell is placed at the lowest point
of each diagonal line.
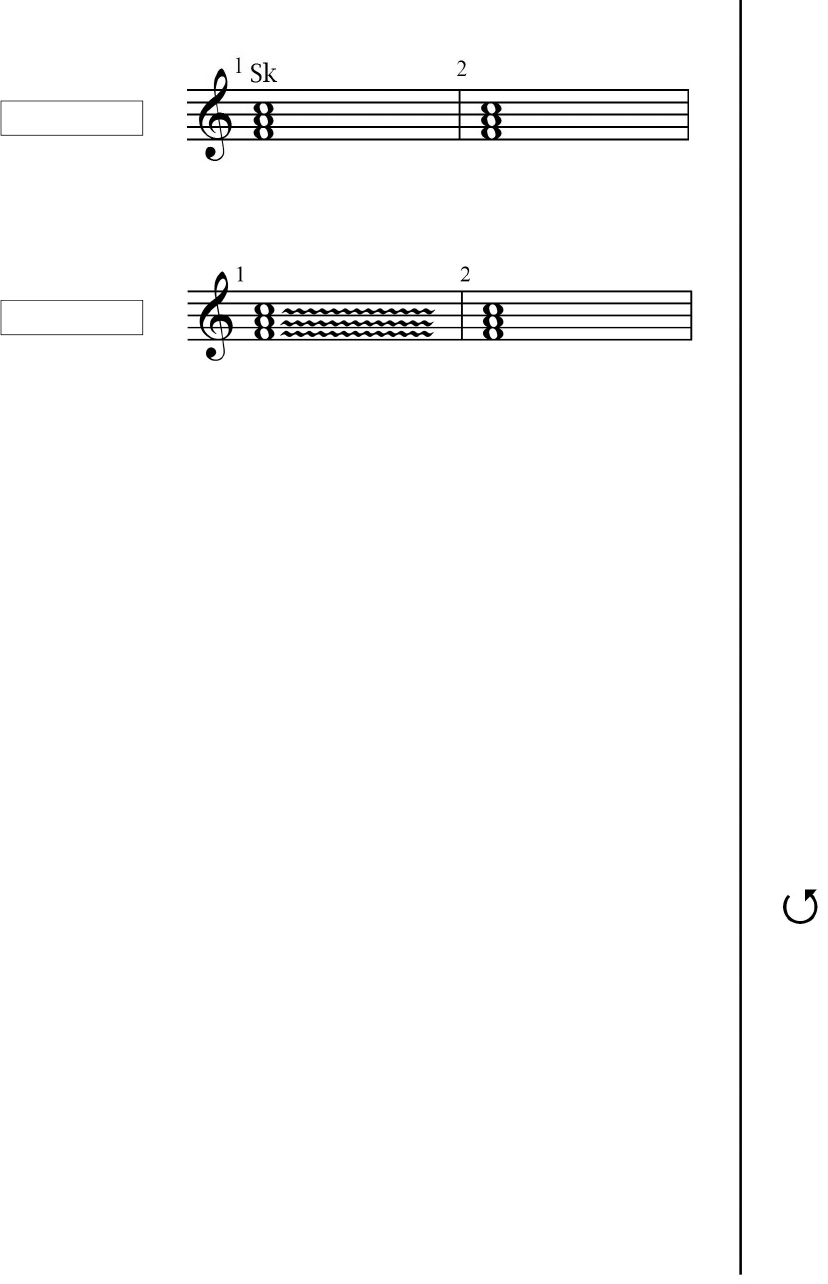
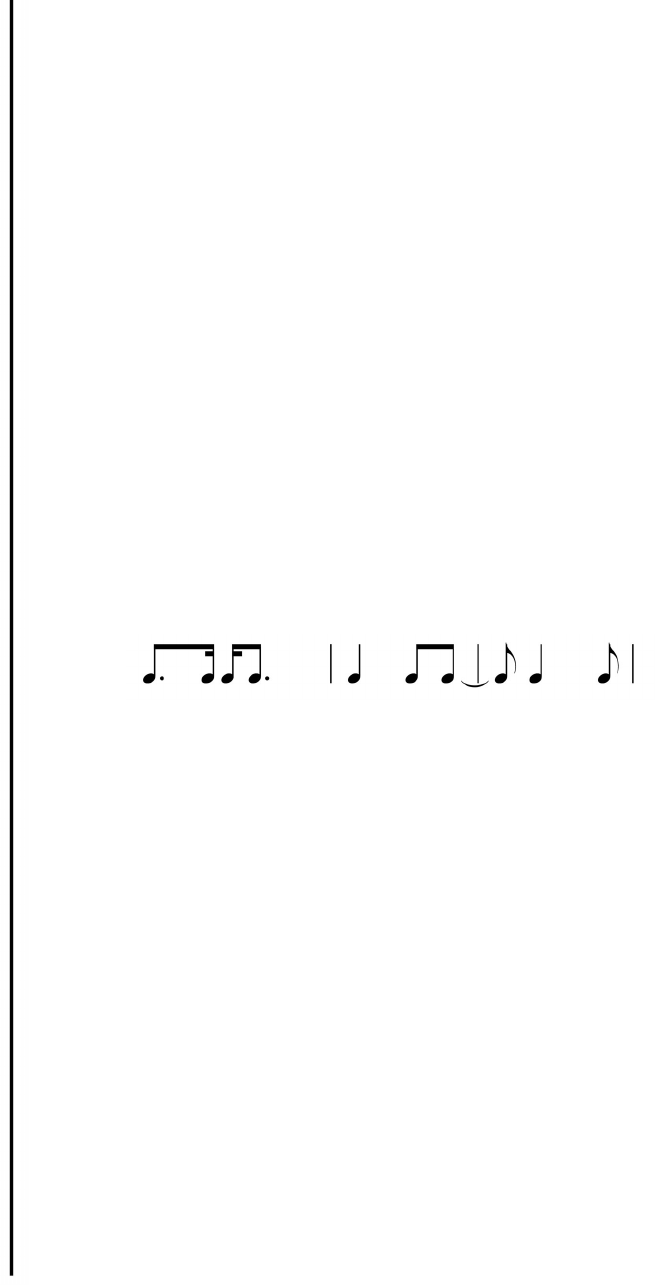
Shake, Sk
or
The Sk or symbols indicates the rapid shaking of a handbell with the clapper
striking both sides of the handbell.
Duration is shown by note value. The following examples illustrate the various
ways to notate a Shake.
1. A continuous Shake for the value of both notes
2. The vertical bracket indicates which notes are to be played with a Shake for the
value of both chords. (C
6, F6, A6) The shake does not affect the F5 or A5. These
two notes are rung normally and tied to the next chord.
3. Shake the full value of the first note. Do not restrike the second note, but allow
the handbell to continue to sound for the value of the second note.
4. The vertical bracket indicates which notes are to be played with a Shake for their
full value in the first measure. The F
6 and A6 are not restruck in the second
measure, but are allowed to sound for their full value in the second measure. The
C
6 is not tied and is to be restruck in the second measure.
Example 27
Example 28
Example 29
Example 26
21
5. A Shake that is stopped just short of the full value of the first chord before
restriking the second chord
Example 30
Example 31
6. An alternate way of indicating a Shake that is stopped just short of the full value
of the first chord before restriking the second chord
A tr indicates alternating the ringing of two handbells of adjacent pitches. The
simultaneous shaking of two handbells of adjacent pitches is often used to simulate
a Trill. In handbell notation, both pitches may be notated.
A BD indicates that a ringing handbell is brushed downward against the chest
resulting in a sudden reduction in sound. This technique may be used when a soft
Ring follows a loud Ring with the same handbell(s). The effect simulates a
forte-piano.
The CD is executed after ringing a handbell, particularly a large handbell, by
sliding a hand or finger(s) up the outside of the handbell toward the rim of the
casting. Varying degrees of pressure will control the diminuendo. An explanatory
footnote may be used.
RT indicates that a handbell is rung close to the shoulder with an immediate touch
of the handbell to the shoulder to stop the sound.
To execute a Gyro, ring the handbell. While holding it in a vertical position, slowly
revolve the handbell in a horizontal plane.
To execute a Spiral Gyro, ring the handbell and revolve it in an upward vertical plane.
The Singing Bell (SB) technique produces a drone by the application of a dowel in
a circular motion around the outside rim of a handbell.
The Singing Bell (SB) makes use of a technique adapted from the ancient
Himalayan or Tibetan singing bowl tradition. Hold the handbell away from the
body so that the casting will vibrate freely. With a wooden stick, a dowel
approximately 1 to 1½ inches in diameter and 6 to 12 inches long, rub the outside
rim of the handbell in a circular motion, keeping an even pressure. Gently increase
the speed until the casting begins to vibrate. Once the sound is produced, vary the
speed as needed to maintain the sound.
Trill or tr
Brush
Damp
or BD
Controlled
Diminuendo
or CD
Ring Touch
or RT
Gyro or
Spiral Gyro
or §
SB
22
Echo or
Vibrato
of vib.
Rolled
Chord
Table
Land
Damp
or TLD
To perform the Echo technique, the handbells are rung normally and lightly, but
precisely touched to the padded table on the beats or subdivisions of the beats, as
indicated by the echo signs.
Example 32a
Example 32b
To achieve the Echo on a handchime, hold the chime close to the tine (tuning
slot), ring the handchime, and then touch the index finger or fingers lightly to the
base of the slot on the beats indicated.
To achieve the vib. effect with a handbell, ring the handbell and gently move it
from side to side using the wrist, not the arm, to produce the wavering sound.
To achieve the vib . effect with a handchime, hold it close to the tine (tuning
slot), ring the handchime, and rapidly and repeatedly touch the index finger or
fingers lightly to the base of the slot.
A Rolled Chord is produced by ringing the notes of the chord in rapid succession
from low to high or high to low rather than sounding the notes simultaneously.
Example 33
To achieve a TLD, damp the handbell by pressing it mouth-down into a padded
table on a given beat. This technique may not be possible on handbells with
clappers projecting beyond the lip of the handbell. An explanatory footnote
should be used.
In Example 32a, the Echo signs affect only the whole notes in both clefs.
In Example 32b, the Echo signs affect the whole notes as well as the tied notes
in the bass clef. In measure 3, only the bracketed whole notes are affected.

23
IX. Seldom-Used Symbols
Bells Used Chart. Now Referred to as HUC (Handbells Used Chart).
Echo (See definition on page 22.)
Hand Martellato
Let Vibrate Until Harmony Changes
Muted Martellato (See definition on page 18.)
Toll (See definition for “Swing” on page 16.)
Toll or Tower Swing (See definition for “Swing” on page 16.)
BUC
LVUHC
Toll
T or
TS

Part B - Handbell and Handchime Music
Difficulty Level System
Assigning difficulty Levels
to Handbell and Handchime Music
24
Rhythm, Articulation, Dexterity
The AGEHR, Inc.
As handbell and handchime repertoire and techniques have increased in number
and complexity, the need for a method of assigning difficulty levels has become
apparent. Having music available with an assigned difficulty level will:
help directors select repertoire best suited for their choirs
help directors select literature that requires specific skills and techniques
assist teachers in creating a curriculum
provide a framework for educational assessment
serve as a motivational tool that encourages choirs to improve their skills
help publishers select new releases for a balanced catalogue
The following system should be used only as a guide. Tempo, number of ringers,
handbell assignments, etc. will have a dramatic effect on the difficulty of any music
selected.
Comments for Directors, Publishers, and Editors
Key changes and accidentals ARE handbell and handchime changes.
Tempo is VERY IMPORTANT in assigning level of difficulty.
Handchimes should be considered as a special category. However, when used
with handbells within the same piece, a handchime should be considered a
“handbell” change.
When a piece contains a six-measure (or less) phrase of technical difficulty
above the specific level assigned, the piece should not be raised to the next level
of difficulty. That phrase should be treated as a “special practice” spot for learning.
Shelley, four-in-hand, grace notes, and sharing of handbells are directors’
decisions based on the size of the group, number of handbells, and dexterity of
the ringers.
Difficulty levels are assigned for “traditional size” handbell choirs, i.e., 11-13
ringers. All levels are cumulative.
Each difficulty level is described by eight criteria. They should be used to
determine the level of the work before selection.
On multiple octave publications, different levels may be assigned to specific
octave designations. Example: a 3-5 octave publication may have the following
designations: 3 octaves L3, and 4-5 octaves L4.
A plus or minus may be added to any level designation when appropriate.
1.
2.
3.
4.
5.
6.
7.
8.
9.
e
e
e
e
e
e

25
LEVEL 2
LEVEL 3
1. Meters: , (Common time), , and
2. Notes and/or Rest Values: whole, dotted-half, quarter
3. Rhythmic Elements: no subdivision of beats, simple use of ties
4. Techniques: Ring, Shoulder Damp, Sk, TD, Echo, Martellato, Sw, RT - all with
adequate preparation time
5. Handbell/Handchime Changes: none (no accidentals)
6. Articulation: see Techniques as listed above
7. Dynamic Levels: all from to in homophonic style (all ringing at the
same level) with limited use of crescendo or diminuendo
8. Tempo: slow to moderate
c
C
2
4
43
44
444
4
All the criteria of Level 1 and
1. Meters: , , (cut time), , and simple mixed meters of , , and
2. Notes and/or Rest Values: eighths, the dotted-quarter followed by an eighth,
simple combinations of eighths and quarters
3. Rhythmic Elements: syncopation - simple patterns such as eighth-quarter-
eighth, anacrusis - pickup-notes or upbeats and their effect on the final measure
4. Techniques: Table Damp, Pl, Martellato-Lift, Malleting, and any combination of
two different techniques with adequate preparation time
5. Handbell/Handchime Changes: limited number of changes per ringer with
adequate preparation time
6. Articulation: see Techniques as listed above
7. Dynamic Levels: crescendo and diminuendo, polyphonic style with simple
dynamic contrasts (such as two voices having different dynamic levels)
8. Tempo: slow to moderate
1. Meters: , , (in one pulse per measure, , , ,
2. Notes and/or Rest Values: sixteenth, dotted-eighth and sixteenth-note
patterns, triplet
3. Rhythmic Elements: syncopation such as
4. Techniques: ring and damp sixteenth-note patterns
5. Handbell/Handchime Changes: moderate number of changes per ringer with
adequate preparation
6. Articulation: combinations of techniques listed in Levels 1, 2, and 3, but not
more than two per measure
7. Dynamic Levels: accents, more variety in dynamic levels
22
23 23
448888
63 39 6
12
pp
ff
All the criteria of Level 2 and
LEVEL 1
26
LEVEL 4
All the criteria of Level 3 and
1. Meters: mixed of and ,
2. Notes and/or Rest Values: all of previous at faster tempo, triplet over two beats
3. Rhythmic Elements: syncopation - more complex, using sixteenth notes and ties
4. Techniques: Brush Damp
5. Handbell/Handchime Changes: extensive number of changes per ringer
6. Articulation: combinations of techniques in eighth-note patterns at moderate tempi
7. Dynamic Levels: subito piano or subito forte without rest, more complex polophony
with more than two independent voices, more rapid shifts of dynamic levels
8. Tempo: more changes of tempo within the work
563
844
LEVEL 5
LEVEL 6
All the criteria of Level 4 and
All the criteria of Level 5 and
1. Meters: irregular meters
2. Notes and/or Rest Values: dotted rhythms in compound meters at fast tempi,
duples against triples
3. Rhythmic Elements: syncopation - more complex, mixed patterns
4. Techniques: ring-hook-damp sequences, handbell passes at moderate tempi
5. Handbell/Handchime Changes: unlimited
6. Articulation: any combination at faster tempi
7. Dynamic Levels: rapid shifts between levels with no preparation, more frequent
use of crescendo and decrescendo
8. Tempo: more changes of tempo within the work, including abrupt shifts
1. Meters: unlimited
2. Notes and/or Rest Values: more than four eighth or sixteenth notes to a pulse
(such as five, six, or seven, etc.) thirty-second notes
3. Rhythmic Elements: complex rhythms at any tempo
4. Techniques: all, any tempo
5. Handbell/Handchime Changes: unlimited
6. Articulation: unlimited combinations at any tempo
7. Dynamic Levels: no limits on shifts (sudden or gradual) or accents
8. Tempo: only those imposed by the nature of the instrument,complex changes
within a work
27
Part C - Solo and Ensemble Notation
I. General Notational Concerns Applicable to Both
Solo and Small Ensemble Music
1.
2.
3.
4.
Notational symbols for handbell techniques as listed in the AGEHR Handbell and
Handchime Notation booklet which are considered standards for large group
handbell music shall also apply to solo and ensemble ringing.
Notational symbols should be kept simple and used sparingly to avoid
overcrowding the page.
Performance suggestions may be indicated with footnotes or symbols in the score.
The AGEHR Handbell and Handchime Music Difficulty Level System does not
apply to solo and ensemble music.
II. Symbols Common to Solo and Ensemble Music
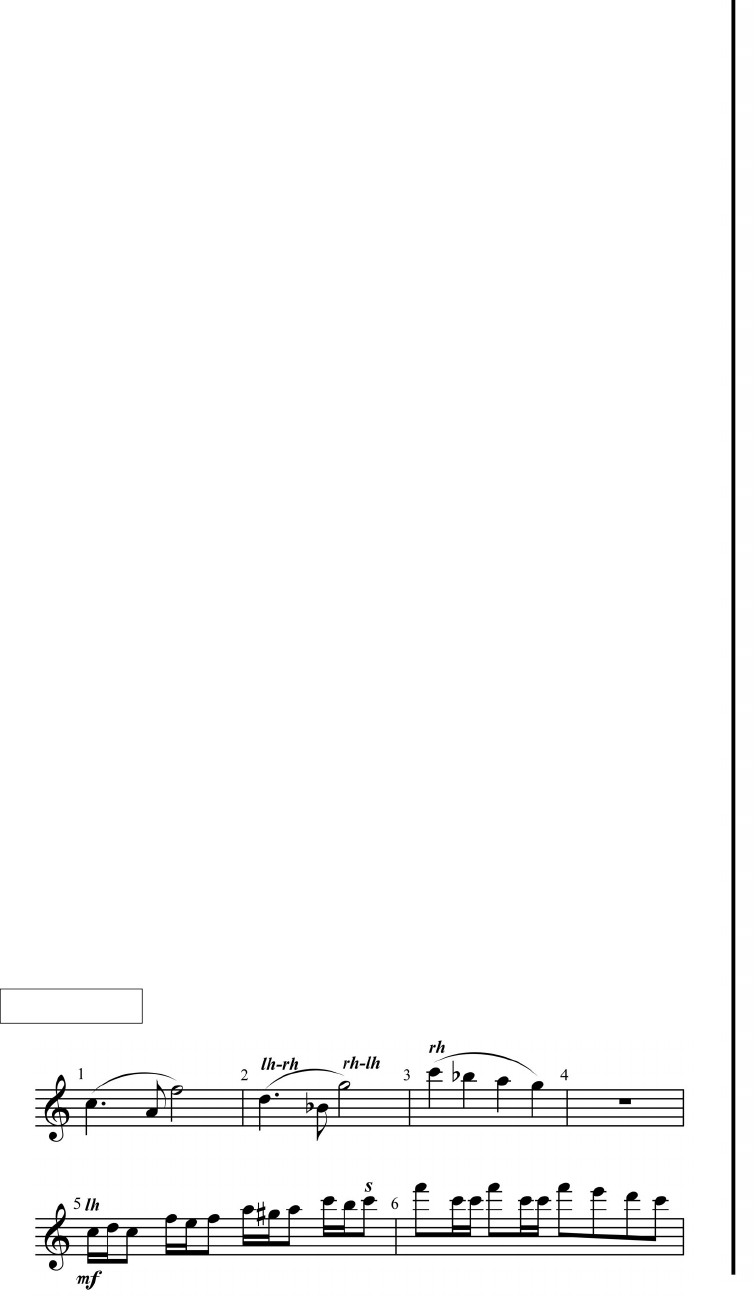
The following designations should be printed in lower case, Italic, bold print. (See
Example 34 below.)
r or rh right hand
l or lh left hand
r-l or rh-lh a handbell passed from the right hand to the left hand
l-r or lh-rh a handbell passed from the left hand to the right hand
s shoulder damp
t table damp
r or rh
l or lh
r-l or rh-lh
l-r or lh-rh
s
t
Example 34

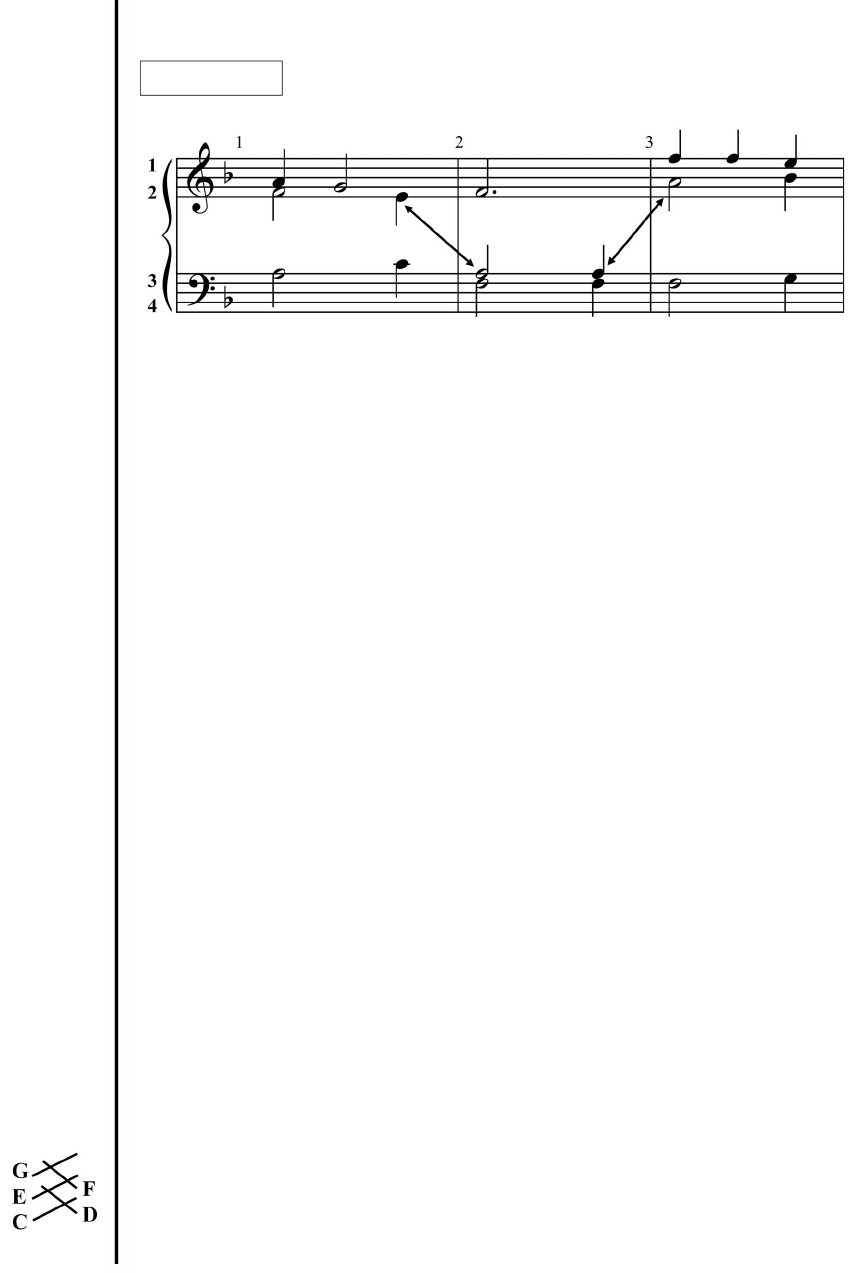
III. Placement of Handbells on the Table
28
Definitions:
Home
Preset
Displace
Reset
Displacement:
Notational Devices:
When a handbell is to be displaced, its position may be indicated by a footnote, in
the performance notes, or in the body of the score.
The following notations are suggested for use in the musical score to indicate
preset or displacement of handbells:
Remove B
b
5 from the table
Remove B
b
5 from the table and put C
#
6 in its place
Place E
6 in the space above and between E5 and F5
Place E6 directly above E5
Exchange positions of C6 and D6
Exchange positions of C
#
5 and C5
The normal position of the handbell resting on the table in keyboard order
To place any handbell(s) out of keyboard order before beginning a piece
To move handbell(s) out of home or preset position during piece
To move handbell(s) back to home or preset position
29
IV. Notation Specific to Small Ensembles
(Duet, Trio, Quartet, etc.)
1.
2.
3.
A grand staff or multiple staves should be used in ensemble music to avoid
using excessive ledger lines.
Middle C and the notes around it may be moved to either staff to facilitate ease
of reading parts and need not conform to the practice of keeping C
5 on the bass
staff.
Parts should be clearly labeled using Arabic numbers in ascending order from
high (treble) to low (bass). (Example 35)
4.
5.
6.
7.
Whenever possible, no more than two parts should be notated per staff.
When ringers share the same staff, whenever possible stem direction should be
used to indicate the part assigned to each ringer.
Position numbers may be used to designate pitches that are to be rung by a
ringer other than the one who has been assigned those pitches. (Example 36)
A handbell transfer from one ringer to another should be indicated by position
numbers separated by a hyphen, the number on the left indicating the passer
and the number on the right indicating the receiver of the handbell. (“2-1” or
“3-2” - Italic, bold print). (See Example 35.)
Example 35
Example 36
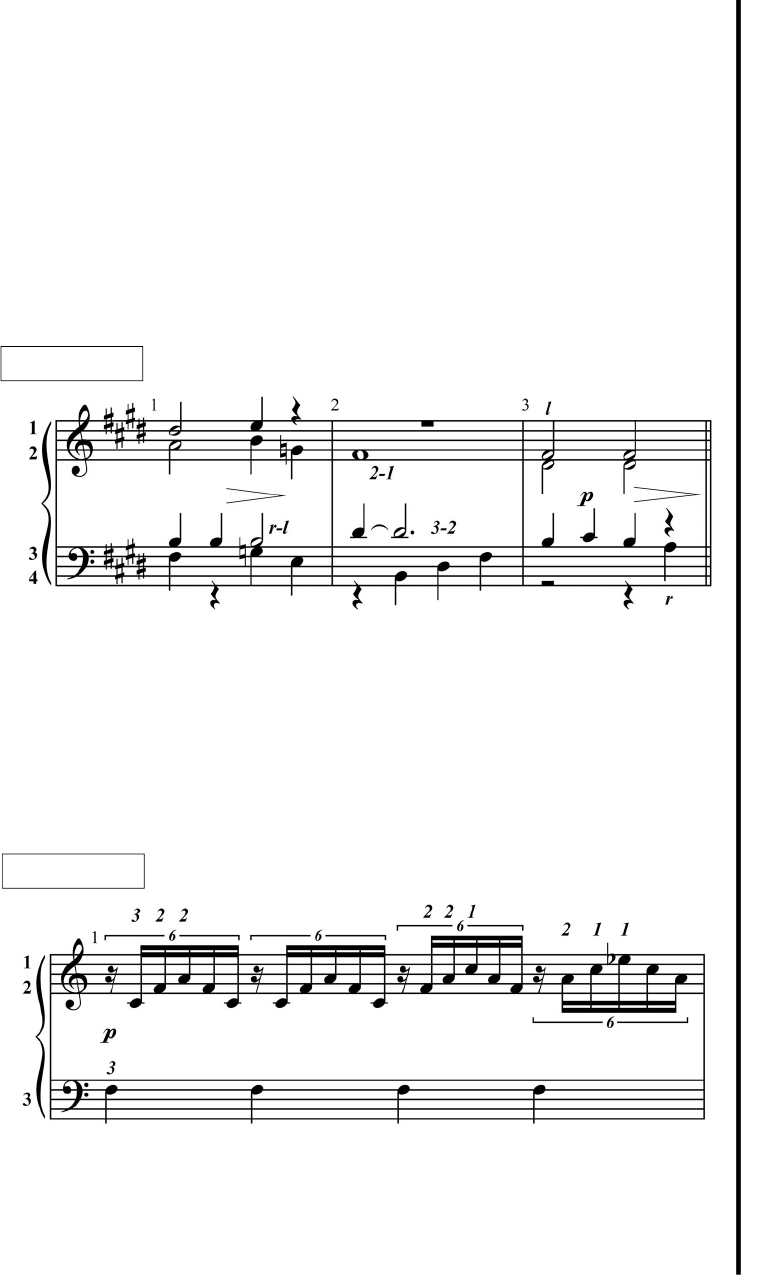
V. Multiple Handbell Configurations
8.
A line with arrowheads on each end may be used to indicate a ringer's part
moving from one staff to another. (Example 37)
Example 37
Definitions:
Primary Handbell
Secondary Handbell
Interlocked
Handbells
Shelley
Alternate Shelley
The handbell which is held between the thumb and the
index finger in four-in-hand or Shelley ringing
An additional handbell held in the same hand with a
primary handbell
Ringing two handbells in one hand in such a way that the
handle of one lies inside the handle of another
Ringing two handbells in one hand in such a way that the
clappers move in the same direction so the bells can be
played simultaneously
Ringing only one handbell at a time while holding two
handbells in the Shelley position
Ringing two handbells in one hand in such a way that the
clappers move in perpendicular planes so the bells can be
played independently
The technique of changing four-in-hand configurations
continuously by keeping one primary handbell as a
constant* in the hand while picking up and putting down
various secondary handbells
*Constant (n.) Any handbell that is kept in the hand to
be rung again rather than returned to the table
Ringing three handbells in one hand
An interlocked series of handbells held by the handle of
the top handbell and rung with mallet(s)
30
Four-in-Hand
(4iH)
Traveling
Four-in-Hand
Six-in-Hand
(6iH)
Handbell Tree
(Bell Tree)
31
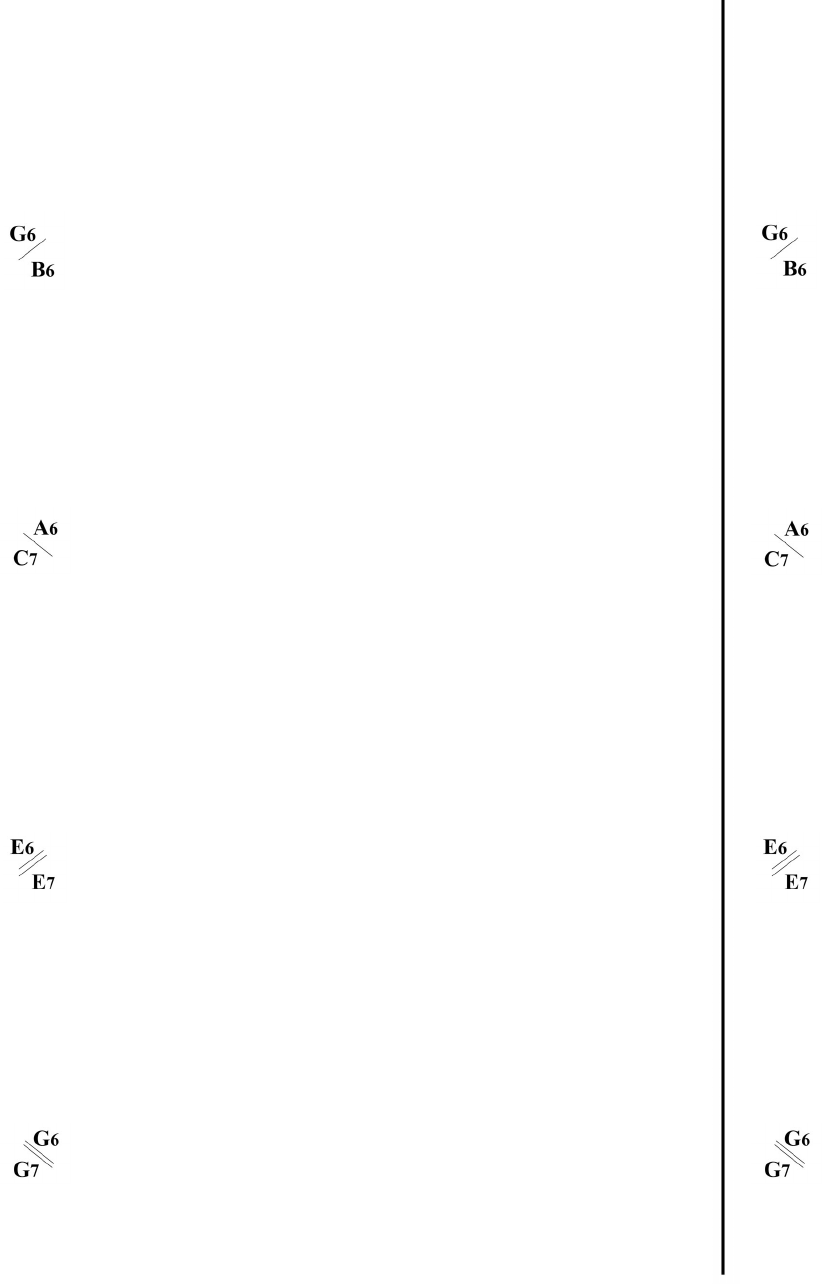
Symbols: (any combination of pitches may be used)
Four-in-Hand for the left hand:
lh: G
6, B6
lh: G6, B6
OR
Handbells are listed in the order they are to be picked up.
G
6 is in the primary position; B6 is in the secondary position.
The handbells ring independently or simultaneously.
G
6 is in the primary position.
B6 is in the secondary position.
The handbells ring independently or simultaneously.
Four-in-Hand for the right hand:
Handbells are listed in the order they are to be picked up.
A
6 is in the primary position. C7 is in the secondary position.
The handbells ring independently or simultaneously.
A
6 is in the primary position.
C7 is in the secondary position.
The handbells ring independently or simultaneously.
rh: A
6, C7rh: A6, C7
OR
Shelley position for the left hand:
Shelley position for the right hand:
OR
OR
lh: E
6, E7
rh: G6, G7
lh: E6, E7
rh: G6, G7
Handbells are listed in the order they are to be picked up.
E
6 is in the primary position. E7 is in the secondary position.
The handbells ring simultaneously or independently as alternate Shelley.
E
6 is in the primary position.
E7 is in the secondary position.
The handbells ring simultaneously or independently as alternate Shelley.
OR
Handbells are listed in the order they are to be picked up.
G
6 is in the primary position. G7 is in the secondary position.
The handbells ring simultaneously or independently as alternate Shelley.
G
6 is in the primary position.
G
7 is in the secondary position.
The handbells ring simultaneously or independently as alternate Shelley.
OR
OR
OR

32
Six-in-Hand for the left hand:
Six-in-Hand for the right hand:
Handbells are listed in the order they are to be picked up.
F
6 is in the primary position; A6 is in the secondary position.
C7 is in the tertiary position.
With F
6 in the primary position
Handbells are listed in the order they are to be picked up.
G
6 is in the primary position; B6 is in the secondary position.
D7 is in the tertiary position.
With G
6 in the primary position
lh: F
6, A6, C7lh: F6, A6, C7
rh: G6, B6, D7
rh: G6, B6, D7
OR
OR
Traveling Four-in-Hand symbols:
Example 38
Example 39
Example 40
Example 41
Handbell Tree (Bell Tree):
Graphic showing a Handbell Tree (or Bell Tree) using 5 handbells
A circle around a note indicates that the handbell is to remain
in the hand as a primary constant until further notice.
A downward arrow beside a note indicates that a handbell
which has been held as a constant should be returned to the
table at the end of the note value.
A double arrow beside a note indicates that both handbells
held in the same hand should be tabled together as a pair, in
four-in-hand (or Shelley) configuration.
An ‘X’ beside a note or pair of notes indicates that both
handbells that have been held as a pair should be returned to
the table separately, each to its own position.